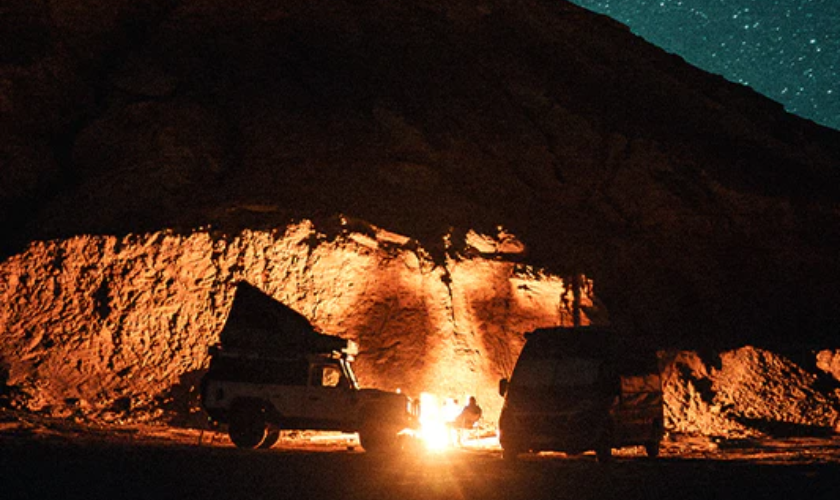
Nighttime Photography Tips for Campers
Camping under the starry night sky offers a unique opportunity for capturing breathtaking nighttime photos.
Camping under the starry night sky offers a unique opportunity for capturing breathtaking nighttime photos.
The key to achieving stunning results lies in
your camera and photography skills and the lighting equipment you use.
In this blog post, we`ll explore some
essential nighttime photography tips for campers, focusing on techniques like
light painting, star photography, and how Wuben lights can be
your trusty companions in illuminating the darkness and making your photos come
to life.
The Essentials of Nighttime Photography:
Before diving into specific techniques, let`s
cover some essential nighttime photography principles:
Nighttime photography is a captivating and
challenging aspect of the art that allows you to capture the beauty and
mysteries of the night. Whether you`re shooting starry landscapes, cityscapes
bathed in the glow of artificial light, or creative light painting,
understanding the essentials of nighttime photography is crucial. Here, we`ll
delve into the fundamental aspects of nighttime photography to help you master
this enchanting realm.
1. Use a Tripod: Stability is Key
The first and most crucial aspect of
nighttime photography is stability. To capture clear, sharp images, you need a
tripod. This essential tool will keep your camera steady during long exposures,
preventing the unwanted blurriness caused by the camera shake. Choose a sturdy
tripod and set it on a solid surface to ensure stability.
2. Aperture, Shutter Speed, and ISO
Nighttime photography presents a magical
canvas for capturing the beauty and mystery of the dark hours. To harness the
full potential of this artistic endeavor, it`s crucial to understand the
interplay between three fundamental elements: Aperture, Shutter Speed, and ISO.
These settings hold the key to bringing out the mesmerizing qualities of the
night in your photographs.
Aperture: The Gateway to Light
The aperture, represented by the f-stop
number, regulates the opening size in your camera`s lens. It has a profound
impact on nighttime photography:
- Wide Aperture (Low f-number): A wide aperture, like f/2.8 or f/1.8, allows more light to enter
the camera. This is particularly advantageous in low-light conditions, such as
capturing stars or cityscapes at night. A wide aperture creates a shallow depth
of field, isolating subjects from the background and producing beautiful bokeh
effects.
- Narrow Aperture (High f-number): A narrow aperture, like f/11 or f/16, reduces the amount of light
entering the camera but increases the depth of field. This is useful for
capturing cityscapes or landscapes with intricate details where you want
everything in focus.
Choosing the right aperture depends on the
effect you want to achieve. A wide gap creates a dreamy, ethereal atmosphere,
while a narrow aperture produces sharp, detailed images.
Shutter Speed: Capturing Time in the Dark
Shutter speed controls the duration the
camera`s sensor is exposed to light. At night, this setting plays a pivotal
role in determining the outcome of your photographs:
- Long Exposures: To capture the faint light of stars, city lights, or any low-light
subject, use long exposures. Settings like 20 seconds, 30 seconds, or even
several minutes are common in nighttime photography. Longer exposures smooth
out water in long-exposure landscapes and create beautiful star trails in
astrophotography.
- Fast Shutter Speeds: In some situations, fast shutter speeds, such as capturing the
cityscape from a moving vehicle, are necessary to freeze motion. However, this
limits the light entering the camera, so you may need to compensate with a
wider aperture or higher ISO.
The choice of shutter speed depends on the
desired effect and the subject. Experiment with various shutter speeds to find
the right balance between capturing light and controlling motion.
ISO: Sensitivity to Light
ISO measures your camera sensor`s
sensitivity to light. In nighttime photography, ISO plays a critical role:
Low ISO (e.g., 100-400): Low ISO settings
produce cleaner, noise-free images. They are suitable for long-exposure shots,
astrophotography, and any situation where there is ample ambient light.
Higher ISO (e.g., 800-3200): In low-light
conditions, you may need to increase the ISO to make the sensor more light-sensitive.
This is essential for capturing fast-moving subjects or when a wide aperture
and long exposure are insufficient.
However, increasing the ISO also introduces
digital noise into your images. The key is to find a balance between
sensitivity and image quality. Modern cameras can often handle higher ISOs with
less noise, making it easier to shoot in low-light conditions.` Aperture,
shutter speed, and ISO are the cornerstone settings in nighttime photography.
Understanding their significance and how they interact is essential to creating
stunning nighttime images. Experiment with these settings to unleash your
creative potential and master capturing the night`s enchanting beauty through
your lens. Remember that practice makes perfect, so don`t hesitate to venture
into the dark and experiment with your camera to unlock the full potential of
nighttime photography.
3. Manual Mode: Take Control
Switch to manual mode on your camera for
full Control over your settings. This is essential for adjusting your aperture,
shutter speed, and ISO according to your shot`s specific conditions and
creative vision.
4. Focus Manually:
Autofocus can struggle in low-light
conditions. To ensure sharp images, switch your lens to manual focus and use
Live View to magnify the area you want to focus on. This technique can be
especially useful for astrophotography.
5. Remote Shutter Release:
Use a remote shutter release or a timer to
prevent camera shake during exposure. This ensures your hands are nowhere near
the camera when the direction begins, resulting in crisp, clear images.
6. Light Sources:
Identify and consider the available light
sources in your scene. Natural light, like the moon and stars, or artificial
sources, like streetlights, can greatly influence your exposure settings and
composition.
7. White Balance:
Adjust your camera`s white balance settings
to match the light sources in your scene. This can help you capture accurate
and visually appealing colors in your nighttime photos.
Nighttime photography offers a world of
creativity and the chance to capture scenes often missed during the day. By
understanding and applying the essentials of nighttime photography, including using
a tripod, appropriate exposure settings, manual mode, and precise focusing, you
can unlock the beauty of the night and create stunning images that tell unique
stories. So, the next time you venture out in the dark with your camera,
embrace the challenges and opportunities that nighttime photography offers and
watch your skills and creativity shine.
Now, let`s move on to specific nighttime photography techniques.
Nighttime photography is a captivating
realm that offers a unique canvas for photographers to work their magic.
It`s a world where stars sparkle, city
lights create breathtaking vistas, and creative possibilities abound.
So, let`s explore specific nighttime
photography techniques that will allow you to capture the beauty of the night
in various forms.
1. Star Photography: Embracing the
Cosmos
Capturing the night sky, stars, and
celestial objects can be a mesmerizing experience. Here`s how to do it:
- Location Matters: Choose a location far from light pollution to maximize the
visibility of stars.
- Use a Wide Aperture: Set your lens to its widest aperture (e.g., f/2.8) to collect as
much light as possible.
- Manual Focus: Focus your lens to infinity to ensure the stars are sharp.
- Slow Shutter Speed: Use a long exposure,
typically 20-30 seconds, to capture the movement of stars and create star
trails.
- High ISO: Set a high ISO (e.g., 1600-3200)
to capture the faint light of stars.
2. Light Painting: Illuminating the
Night
Light painting is a creative technique using
a light source to "paint" or illuminate a subject. Here`s how to
create stunning light-painted images:
- Composition: Choose an interesting subject,
such as a tree, building, or any object you want to highlight.
- Camera Settings: Use a tripod and set your
camera to manual mode.
- Select Your Light Source: Wuben flashlights and
headlamps are excellent tools for light painting due to their versatility and
various lighting modes.
- Experiment: Shine the light source on the
subject during a long exposure (usually 15-30 seconds) while moving it around
to create unique lighting patterns and effects.
3. Urban Nightscapes: City Lights and
Skylines
Cityscapes at night offer stunning visual
opportunities. To capture the essence of an urban setting at night, follow
these steps:
- Scouting: Find a vantage point that offers
a clear view of the city skyline or an iconic building.
- Use a Tripod: Steady your camera on a
tripod to maintain sharpness in your images.
- Balance Exposure: Adjust your aperture for
sharpness, use a moderate ISO setting to reduce noise, and select a shutter
speed that exposes city lights well without overexposing.
4. Astrophotography: Beyond the Stars
Astrophotography delves deeper into the
universe, capturing planets, galaxies, and other celestial wonders. To embark
on this cosmic journey:
- Use a Telescope: A telescope or telephoto lens with a sturdy mount is essential.
- Guided Tracking: Invest in an equatorial mount or star tracker to keep celestial
objects in your frame without star trailing.
- Long Exposures: Capture long exposures to reveal faint details of distant
celestial bodies.
- Image Stacking: Stack multiple shots to reduce noise and enhance image quality.
Nighttime photography opens up a world of
creativity, where you can capture the magic of the night sky, the captivating
effects of light painting, the allure of urban nightscapes, and the mysteries
of the cosmos through astrophotography. Each specific technique offers its
unique challenges and rewards. As you venture into nighttime photography,
remember to be patient, experiment, and enjoy the process. The night is your
canvas, and your camera is the brush; create your masterpiece under the stars. Nighttime
photography adds a new dimension to your camping adventures, allowing you to
capture the beauty of the night sky and your surroundings in unique ways. Armed
with your camera, a tripod, and trusty Wuben lights, you can
create stunning images that tell the story of your camping experiences. So, the
next time you`re out in the wilderness, don`t forget to explore the world of
nighttime photography and let your creativity shine under the stars. Happy
shooting!
Recent Blogs
-
How to Make Weight Loss Feel Less Overwhelming and More Sustainable
-
How to Balance Hormones and Lose Weight: Smart Strategies That Actually Work
-

How to Choose the Best GLP-1 Natural Supplement for Weight Loss (Without Wasting Money)
-
How to Fix Low Energy & Wellness Gaps with Smarter Health Optimization Supplements?
-
Comparing Mechands Water Meter Key with Traditional Tools